I love 18th century embroidered waistcoats. Whenever I see one – be it in a museum, an auction catalogue, or on an reenactor – I want them all. Or at least one.
Now this is a kind of men’s item and I am not a man. And I am short and have a chest and hips which is a pretty antithetical to the fashionable men’s silhouette of any time period.
But then I got an invite to a reenactment event that was supposed to take place in 1783…

Joshua Reynolds – Lady Worsley

LACMA – Redingote M.2009.120
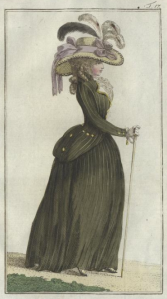
And in the 1780s there wasn’t just a trend for riding habits that looked like military uniforms. But also one for big buttons, lapels, collars and the visible vests/waistcoats that looked like menswear in general.
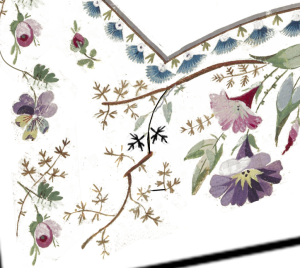
Obviously the next step of that fashion wouldn’t be just wearing plain waistcoats but embroidered waistcoats. And there are indeed three extant examples that can be kind of dated into the 1780s. One in the Decorative Arts museum in Lyon, France, two others in the V&A in London.

Lyon
The one in Lyon is multi-colored and goes over the hips. But the whole ensemble contains a jacket that has been clearly altered with a very non-18th century dart. Obviously this is noted in the museum’s description, however it is worded without making a distinction between jacket and vest. So it is possible that the waistcoat itself is subject to a 19th century alteration. The worst case would be that it is a men’s waistcoat, altered for women’s wear. It doesn’t seem like it to me though. It’s clearly not professional embroidery work (the chain stitch is way too irregular for that) and the whole pattern is very unlike a men’s waistcoat (especially the button/buttonhole placement and the overal shape of the garment).

V&A Museum, T.380-1967

V&A Museum, T.670B-1913
The waistcoat in the V&A shown on the left doesn’t have hip flaps and it’s monochrome. And even though the shape says 1780s, the museum insists it’s 1790 on the dot. I call shenanigans. The one on the right is embroidered with gold and blue floral vines and also dated to around 1790.
Finally, there is also a mention of an gold-embroidered “manns-gillet” (men’s vest) in the June 1787 edition of “Journal des Luxus und der Moden”.
-
-
Journal des Luxus und der Moden, June 1787
-

-
Journal des Luxus und der Moden, June 1787, page. 198
Arguably, this is not the greatest proof that my waistcoat would have made this way for a lady. But it’s enough to rationalize it as possible.
Having found the excuse to do a waistcoat for me, I started to look at the embroidery on a lot of 18th century waistcoats in close-up detail.
The usual look of men’s waistcoats is characterized by extremely even, generous and clean stitching, implying seasoned professionals at work.

From a suit at the Metropolitan Museum (C.I.66.37.1a–c)
Unless the whole suit is done in chain stitch/point de Beauvais, these waistcoats are usually all done in satin stitch and stem stitch. (There are a few waistcoats that show the long-and-short satin stitch, but mostly color shading is done by satin stitching small area with small color variations.)
The embroidery is also very decisive and once the embroiderer decided that rose leaf #4 is to be stitched from southeast to northwest, then all other rose leaves#4 on that side of the waistcoat will also be stitched from southeast to northwest. And while that sounds pedantic, it’s effective. In the process of making the waistcoat work for my sewing pattern I stretched and bend my embroidery pattern for the flower border a bit. These flowers were not that even, not even on paper. But stitched in the same direction, they look actually more alike than they did on paper.
Now I went into the project with a similar mindset as I had with the quilted petticoat – I am not doing this again, so I better to the best waistcoat I can make. I splurged on expensive silk satin, proper silk embroidery floss and a proper large embroidery frame. And I didn’t go for an easy embroidery pattern, but one I really liked.
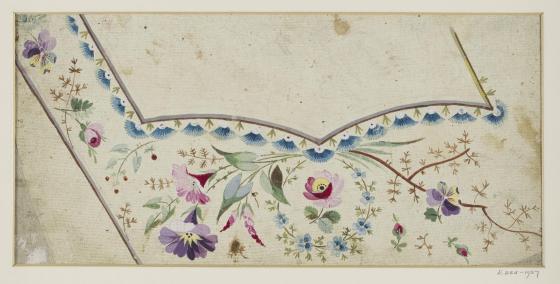
main design, V&A E.255-1937
My embroidery pattern came from the V&A. They have a collection of 1780s watercolors that are embroidery designs for waistcoats. They were made by Jean Pillement and Charles-German de Saint-Aubin. The advantage of using these was that I am not competiting with an extant garment but am still pretty close to using a historically correct design.

pocket flap, V&A E.269-1937
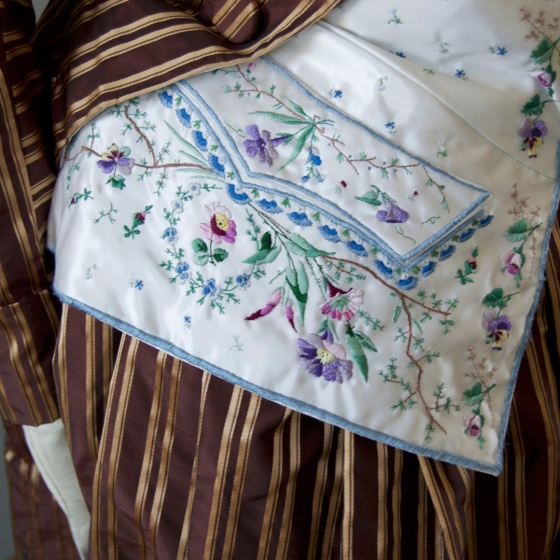
The design I liked best had no pocket flap, so I I just stole a pocket flap from a similar design. I also took the small flower pattern that is all over the waistcoat from a third design but altered it so heavily that you cannot really tell its origin.
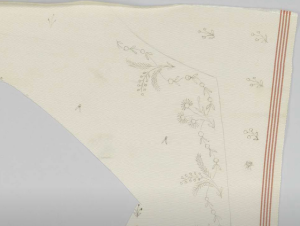
I also had to adjust the design of the hip flap since its front edge was not meeting in the middle like my waistcoat pattern would need to. I filled the remains out by replicating a few elements from the other side of the flap. Also the design is not in the best condition so I had to guess a few times what to draw in.
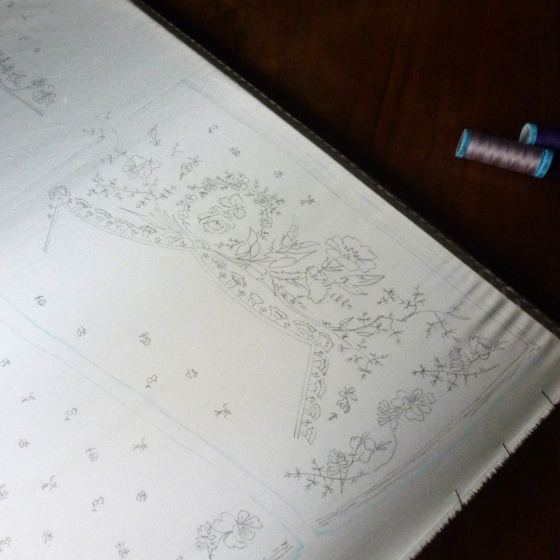
I printed the pattern on a transparent paper, turned on my light table (which is a regular glass table under which I put a very bright lamp) and a podcast and spend a long time transferring the pattern. I used a very sharp pencil because I need clear lines for small details and it needed to stay for all of the embroidery process. (Pencil was further justified by a barely embroidered waistcoat panel in the Rijksmuseum in which you can still something that resembles a penciled outline.)
Rijksmuseum, BK-2001-6-B
After that, I started to embroider and that’s really the long and short of it. I am not quite sure how much time I spend embroidering, I wager it’s between 100 and 120 hours. In this time I managed to watch the entirety of Stranger Things four times which sounds weird but actually not needing to watch while watching television is really helpful. Embroidery is also repetitive and not intellectually challenging but unlike quilting your eyes need to be on the embroidery all the time.
It was surprising that what took most time was the all over pattern. It looks like nothing but it contains five different colors and I didn’t connect threads between the flowers. So I made a little knot on my thread, embroidered, made a small knot at the end of the embroidery, cut it off and then rinse and repeat for 200 duotoned/tricolored flowers.
That took time and was incredibly annoying. I completely underestimated that part. I also underestimated that doing the border would be intense. Just doing the border of one pocket flap took 1.5 hours.
Being too pedantic with color was a bit of an issue since I didn’t calculate the final effect. I rejected a light blue because it had a slight green tinge and used it more sparingly elsewhere. On the final garment I cannot tell the green-tinged blue and the other blue apart. On the roll some colors look fairly garish and intense. When there is only half a square inch of it in the middle of white satin, it loses some of that intensity.
All in all, I used 26 different colors. 6 greens, 2 browns, 2 yellows, 1 black, 1 white, 5 blues, 5 pinks, 6 purples. The color I used most was the light blue for the border.
I had to actually map out where which color would go and in which direction it had to be stitched because switching between elements made it hard to keep track of:
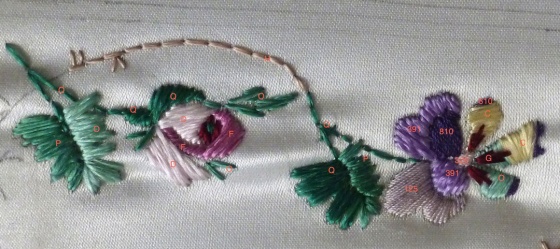
Each number/letter corresponded to a unique color.
After finishing the embroidery I let the embroidery hang out for two days, hoping it would stretch out all creases. It did.
Then I cut it apart and started on the “Tailoring for dummies” part of making this waistcoat.
I had researched this a bit and it was obvious that the material needed interfacing for stability. I decided to err on the stability side: the pocket flaps were underlined with a layer of cotton coutil, then two layers of stiff linen canvas interfacing and were lined with white silk taffeta.
The waistcoat itself was underlined with a firm cotton duck, the hip flaps and front were interfaced with one layer of the stiff linen canvas. The lapels were interlined and padstitched to one layer of cotton coutil. The whole waistcoat was backed with a vintage/antique fine linen chintz.
Then I made the buttonholes, the buttons and a plain linen back that laces up for adjustment.

Just making the buttons took three hours. That was the point where I grew very tired of this project.
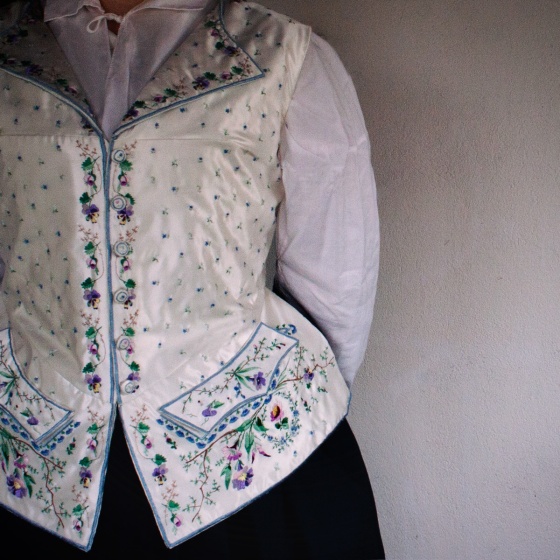
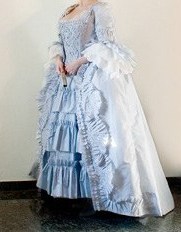
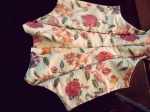
Finally wearing it.
Now I only needed a matching 1780s riding habit….